


As promised, here is my last post in the Christmas Treat series!
My mom recently got me a subscription to Taste of Home Magazine because she really enjoys it. All the recipes are from readers so even though they vary in difficulty, generally, they don't require a ton of weird ingredients and aren't super difficult. This was the first issue I received and I've been so happy with it so far! I decided to try the Christmas tree brownies that were featured on the cover and I wanted to share it with you guys!

I've never tried to do anything like this before so it was a bit of a learning process. Also, I decided to use a box of brownie mix to make it easier because I think this is something that can be done inexpensively and done on short notice as a fun family activity. You don't have to have the ingredients to make royal icing, all of the different decorating gels and icings, sugar candies, baking chocolate etc. The only things I bought for this was a box of brownies and one can of frosting which came out to around $3.
It would also be a fun alternative to regular brownies to take to a Christmas party or event.

1. Line your baking dish with aluminum foil and grease it. Make sure you get the edges where the foil creases really well! I didn't and I ended up having to cut them off.
2. Make your brownie batter and bake according to the box or your recipe!
3. If you're like me and you can't draw a stick, make a stencil of the shape you're going for so you don't mess up the actual brownie.

4. Gather your decorating supplies. I just used green icing I bought and the sprinkles that came with it, Christmas sprinkles, edible pearls and powdered sugar that I already had.
5. Prepare your icing. I put about half the can in a bowl and put some powdered sugar and water in it to make it smoother. I also made a white icing just using powdered sugar, milk and vanilla extract.
6. When your brownies are done baking, lift them out of the tin foil after they've had a chance to cool. Then, refrigerate them because it'll make cleaner cuts with the stencil if it's cold.

7. Cut out your shape and save the extra pieces! You can decorate those or make a star from them for the top if you want.
8. Start decorating! I made a make-shift pastry bag with a ziploc for both icings. Tip: Do a thin first layer of frosting which I was taught to call the crumb layer. Brownies get flaky on the top so it's going to mix in with your frosting so if you do a thin first layer you can lock all of that down and then go back with a thicker layer to cover it up.
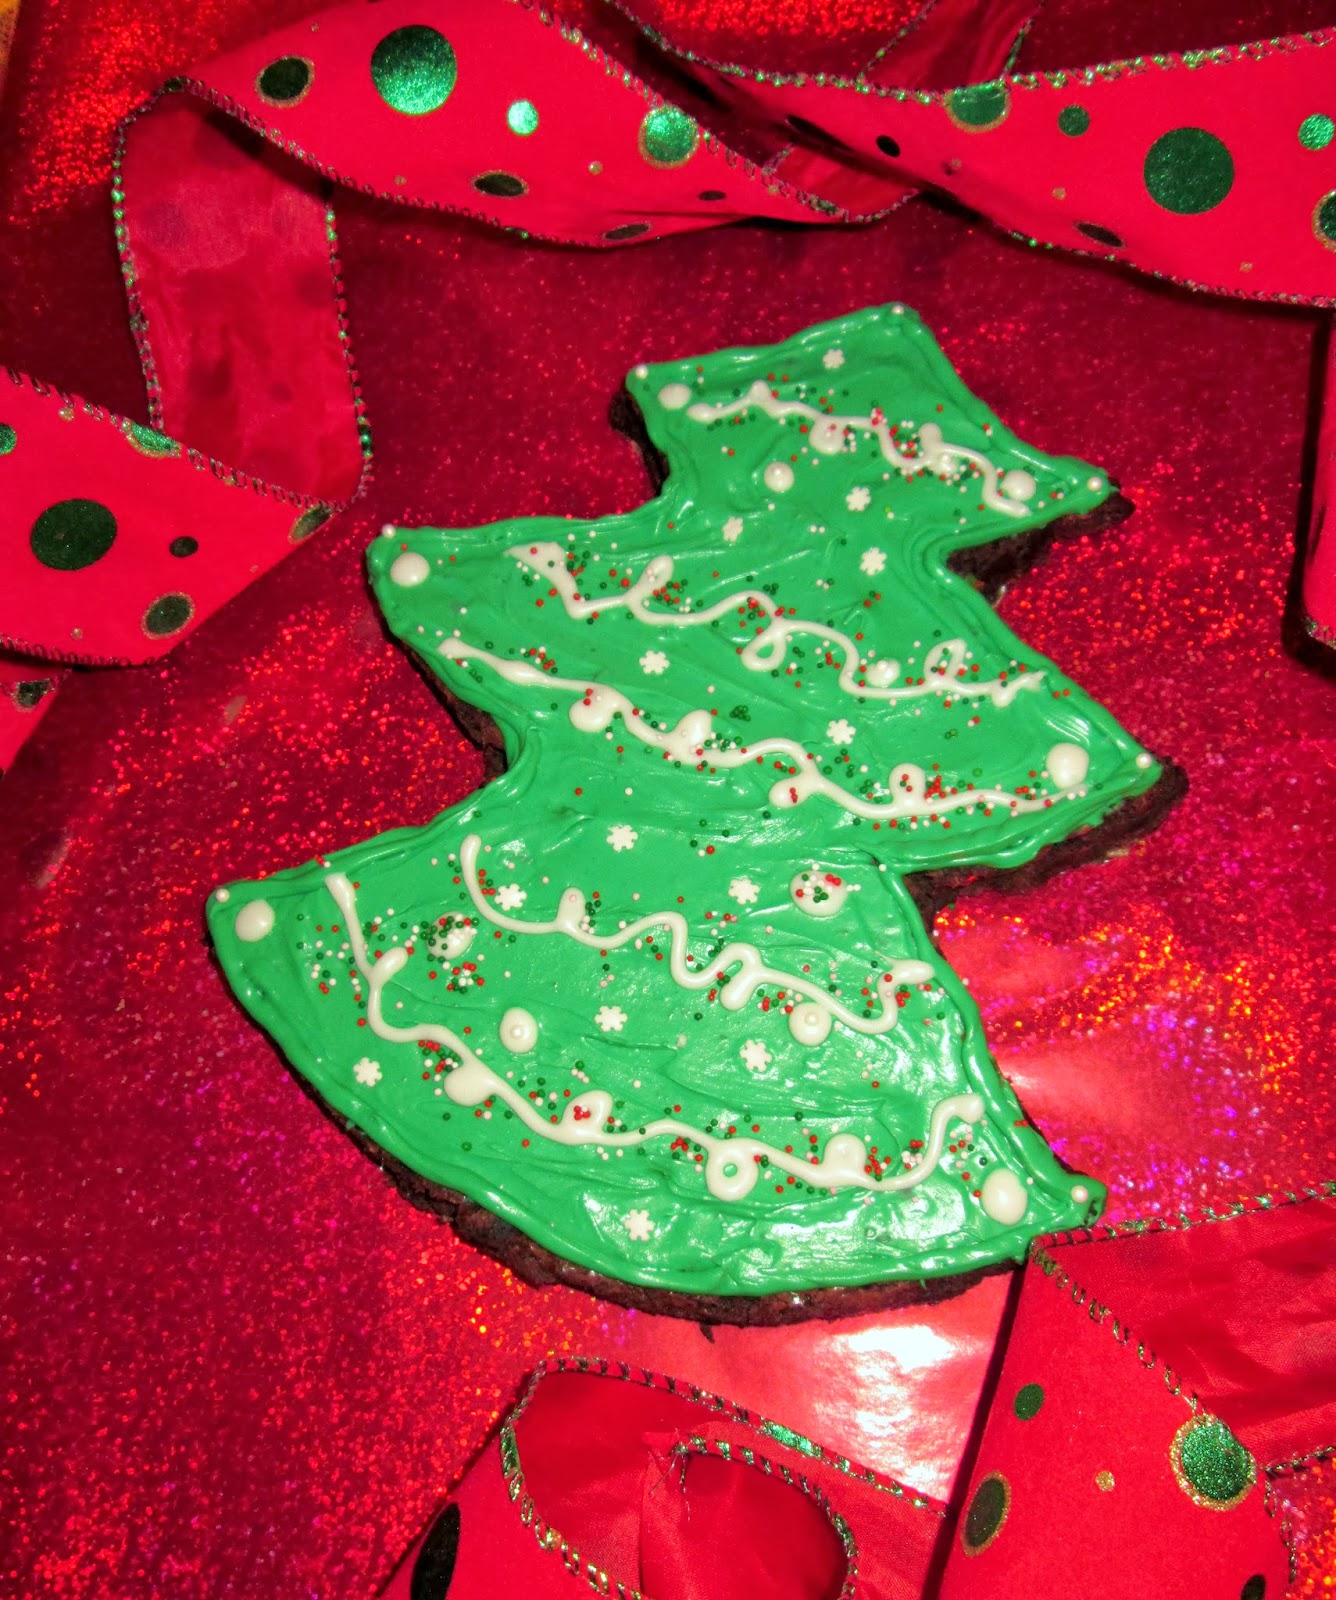

And we're finished! It's not exactly the one on the cover but I was pretty proud of it, I have to admit!
I will say that this was a little difficult. I got discouraged a couple of times when the brownies cracked and because I was trying to make it look perfect. I'm not a professional so it just wasn't happening. It started to get fun when I stopped trying to make it perfect and just started decorating and enjoying it.
Next time I do this it will be much easier and if you guys try it and you follow my tips you won't have the same problems I did!
What do you guys think of how it turned out?
Happy baking and decorating!
This looks so tasty and so fun to make!! The best part of baking is definitely the decorating (and eating!)
ReplyDeletehttp://laurenslittleblogs.blogspot.co.uk/
xx
Yes! They are so yummy! I didn't want to cut it at first!
DeleteThey look so yummy! I'm definitely going to try this out as I'm making the desserts for Christmas this year :)
ReplyDeletehttp://whattaylorbuys.blogspot.co.uk/
So glad you like the idea! :)
DeleteThis looks so yummy! It turned out great!
ReplyDeleteI'd be happy if you check out my giveaway for a chance to win a pair of eyeglasses or sunglasses from Firmoo.
Omg this came out so great and it looks so easy to make! Awesome job!
ReplyDelete-Alex
http://www.monstermisa.blogspot.com/
Thanks so much, Alex!! :)
DeleteThat is awesome - I would never have thought before about decorating brownies before - but it looks great!
ReplyDeleteI know! I thought it was an adorable idea!
Deletethat looks so great! It looks so yummy!
ReplyDelete-Sisi
Modern Beauty Girl
Thanks! They are! :)
DeleteThis looks great! Definitely better than what I would make. Plus, as long as the taste good, who cares! :)
ReplyDelete~ Joanie
www.flonmymind.com
Thank you! You're right, and they're delicious! :)
DeleteThis is such a cute idea! I'm the worst baker ever probably. Cooking, yes. But baking... not so much. Might beg my sister to make these for me, they look delicious! x
ReplyDelete9 out of ten | find and follow me on bloglovin
I thought so too! If you make it from a box like I did it's super easy!
Delete